Wednesday, October 31, 2012

More Weekender

I LOVE my Weekender!!! 

I'm not quite done with it; putting that lining in is a bit of a bitch.  I got the bottom of the lining tacked down (ugly work, but its covered anyway) and am still doing the hand sewing around the zippered opening.  I think it needs to be tacked at the seams where the main panels meet the side/top panels, just to keep it tidier inside.  I'll blog more about it all when I'm completely done, and put in my two cents on what changes I made and what I think would make the next one go more smoothly. Here is a picture of it in its not quite done state (oooh! my first picture!)


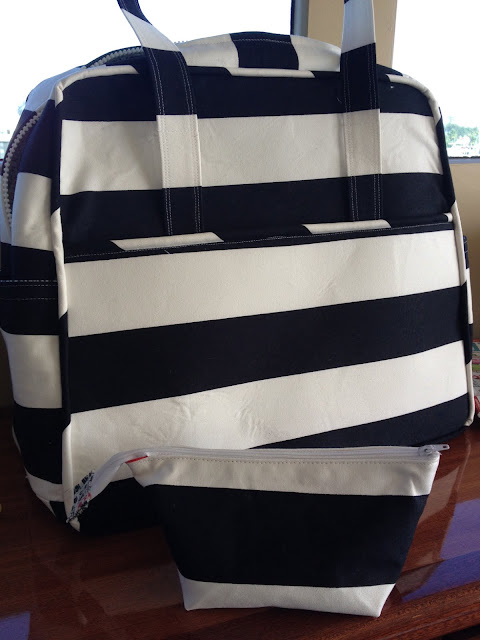
So, I'm writing because of what is wrong with the picture. Not the picture so much (I'm sure there's much wrong with it, but I'm not striving to be a photographer) as what is in it. You can see my Weekender and the little pouch in front of it (made using this tutorial at Noodlehead) (ooh! my first link!) 

First, the little pouch.  It was kind of weird to make, what with pushing the zipper out of the way, and I wonked it a bit.  You can see the little wee bit of the red lining peeking out a the end of the zipper. I didn't want to remove the stitching to do it over, but I'm going to because otherwise it will bother me forever.   The next three that I've cut out I'm certain I will do better.  Just need some more zippers (anyone know a good source?).

Second, The Weekender.  There are a couple of things I see that are issues. First, fusing the Peltex to the exterior fabric has left some wrinkles. Of course, some of them could be from turning the bag inside out and back again through a couple of the steps. The pattern doesn't say to fuse the Peltex directly because we aren't asked to use fusible Peltex.  I spent more on the fusible and perhaps saved the step of using the prescribed separate fusible to attach it to the main fabric.  I do like the fusible Peltex, but maybe when the instructions said to hold the iron on it for 10 full seconds I skipped seven a few. 

Also, see near the top where the handles used to be stitched to the bag? Might be hard to see in the picture; its just below the first navy strip at the top.  When I was turning it right side out, the stitching just ripped right out! Well, that won't do on a bag of this otherwise robustness.  I'm going to use my secret weapon to fix them. 

Ok, that's enough for now.  I'll have more pictures later (today or this week) that show the lining and maybe even another thing or two. 

When I'm done, should I put the picture of the finished bag on Flickr?  Should I link up to something?  Where does one find the etiquette on these things?  Research, research, research, sew, sew, sew . . .

Holli

Saturday, October 27, 2012

Weekend(er)

I am making The Weekender. I should link to the good people who are hosting the blog hop about this. Forgive me for not yet knowing how. I'll get there. I picked some home dec fabric and cut it out earlier this week. Then I realized I needed more Peltex (and didn't pay attention to the kind I have - 72F, double sided fusible) as well as the fusible interfacing, so I took a quick-ish trip to the biggest JoAnn's around these parts, a much longer drive than the closest JoAnn's, but it's always a bummer to go the easy route only to learn that they don't have what I want, right? I also wanted to try to find a lining that would go with the home dec I had cut (NOTE: figure out how to add pictures to posts!). I am/was thinking I'd make two Weekenders so decided to get a whole bolt of the Peltex since one Weekender takes 3+ yards. I couldn't find the 70, so I bought the 71. The 71 is fusible on one side . . . And $3 per yard more. I didn't realize this until checking out, but thought $8.99/yard for 20" wide material was a bit steep. Thankfully I had a 50% off coupon. I went back to the interfacings section(because I really couldn't believe it was $8.99/yard even though that was printed on the label) and that's when I learned about the important differences. I was in a rush so I didn't exchange it (helped by the thought of the 50% off) and just hoped that as I worked on the bag(s) I'd really appreciate the benefit of the fusibleness. This morning after kayaking around the bay with the Captain and Elvis (he should have a title, I think), I got back to work and cut out the Peltex. Well, first I made templates of the pattern pieces. Figured if I was going to make more than one bag, I should have something more substantial than the paper pattern. Also, because I read all (ok, just some) of the instructions, I noticed that we are to lay out the cut exterior fabric pieces onto the Peltex, cut them out, and THEN measure 1/2" all around and cut that OFF - thereby wasting full inches of very expensive material. Instead, I made a second template for the main pieces, these templates already reduced by 1/2" all around. Then I cut out the Peltex and am unsure if I actually saved any in the process, but it felt like a frugal thing to try. I made the straps longer, and then remembered I'd read that others made them wider, so I recut the Peltex to 1-1/4" vs the 7/8" the pattern calls for. Later, I had to figure out how wide to cut the lining (which becomes the handles) and after much mathiness determined it was 3-3/4" (vs 3" in the pattern). I'm trying to keep track so I'm writing these things on the pattern instructions. Well, after all that work (it wasn't that much but kind of it was) I decided I didn't like the fabric I chose, so I chose something else and cut it all out. It's a wide stripe, navy and white (rather nautical I think) and then worked to match the stripes up on all the pieces. We'll not know until actual sewing takes place whether I was successful. Pictures would help this post immeasurably. Who would wade through all of this? Yikes, I'm bored just looking at it! It's a gorgeous day here. We're all up on the fly bridge. Time for a little nap, and then back to Weekender. Good thoughts being sent to people on the East Coast. Stay safe. **snazzy signature here!**

Tuesday, October 23, 2012

First Post

I follow lots of blogs, all quilty-crafty ones. I am amazed at the time and generosity of all of you in sharing how and what you create. I have learned so much. Thank you. I live on a boat a good chunk of time. And here is where I sew. I made my first quilt aboard this boat last year, for my best friend's first grandchild. I used a pattern, and then did it differently from what the pattern called for. That seems to be more common than not. Then when I was done, I bought a bunch of fabric scraps and remnants at a garage sale here in town, to start building my stash. We converted the guest quarters into my permanent sewing cave about six months ago. It's small but I love it! I would like to add to the conversation, and share what I've made using the ideas and patterns and fabric and notions you have told me about or have made yourselves. Working and creating in a small space has its challenges and maybe that's an area where I could have something useful to share. That's probably enough for my first post. I'm uncertain whether I really want to do this - it's such a commitment that you all have taken on. But what a great way to stay on top of projects, give and receive encouragement, and just enjoy the absolutely terrific people out here who share themselves and their love of all things fabric! Setting sail, here I go! Holli