Wednesday, March 20, 2013

Monday, February 25, 2013
It's All About Me!

Hosted by Marlene Bush and Madame Samm this hop is showcasing some really amazing creativity! I wasn't quite sure how to approach it. A bit nervous at my first ever blog hop, and having never tackled the techniques in Amy Bradley's adorable and well-written pattern, I pretty much stuck to it.

Minor changes, like the always-there gray roots, a bit longer hair, an attempt at nautical fabrics (the dress is actually from one of the Captain's cast-off shirts), and a nod to my cute little dog Elvis is about as far as I went. I don't have quite the middle depicted here but wasn't certain of my ability to made that modification (in fabric or in real life - ha!), and it may have made more sense to put a glass of wine in that left hand!
Now, go look at the really creative work that has been done out there! And, be sure to check out the top three of the day at Sew We Quilt -- there's a really great drawing if you comment on everyone's blog!

Now, go check out the other "me's" - and thanks for stopping by!
Holli
Monday, February 25
NautiStitcher (you're here)
Tuesday, February 26
Wednesday, February 27
Thursday, February 28
Madame Samm
And, you should definitely go back and look at the creativity of the bloggers who have gone before today! Here they are:
And, you should definitely go back and look at the creativity of the bloggers who have gone before today! Here they are:
from last Tuesday, February 19
from Wednesday, February 20
from Thursday, February 21
from Friday, February 22
Saturday, February 2, 2013
Zippy!
This was so quick and fun! And look! I have my own triple zip pouch! I'm so excited!


Thanks to Debbie at A Quilters Table for the tutorial and the TZ Along on Flickr! I used Debbie's tutorial for most of it, and then went to the tute Marci posted to help with the final bit. Thank you, ladies!
I used a directional print for my main fabric and if I'd read through the instructions before cutting/fusing, I'd have cut it differently. I did allow for the directional but there's some backwards on the reverse. I won't look at it just like I don't look at the back of my hair when I'm getting spiffed up in the morning (or afternoon, or not at all, as the case may be).
I used pins on the first zip (1B) but that was painful and time consuming, so I switched and from then on I machine basted one bit or the other (the lining or the outer fabric) to the zip and THEN sewed whatever wasn't basted to the basted part (I see why writing a tutorial could be challenging!). My linings shifted ever so slightly, so before I did the final steps, first I rotaried them even.
I just love this. I'm so glad I used fabric I actually like, vs my typical MO. I'd love to make a larger one, and box the bottom.
Happy Saturday! Holli
Thanks to Debbie at A Quilters Table for the tutorial and the TZ Along on Flickr! I used Debbie's tutorial for most of it, and then went to the tute Marci posted to help with the final bit. Thank you, ladies!
I used a directional print for my main fabric and if I'd read through the instructions before cutting/fusing, I'd have cut it differently. I did allow for the directional but there's some backwards on the reverse. I won't look at it just like I don't look at the back of my hair when I'm getting spiffed up in the morning (or afternoon, or not at all, as the case may be).
I used pins on the first zip (1B) but that was painful and time consuming, so I switched and from then on I machine basted one bit or the other (the lining or the outer fabric) to the zip and THEN sewed whatever wasn't basted to the basted part (I see why writing a tutorial could be challenging!). My linings shifted ever so slightly, so before I did the final steps, first I rotaried them even.
I just love this. I'm so glad I used fabric I actually like, vs my typical MO. I'd love to make a larger one, and box the bottom.
Happy Saturday! Holli
Thursday, January 31, 2013
That was fun!
Lots of things made this month!

1. Triangle Quilt; still too small, 2. Retro Flowers; Need Nine More, 3. Pinwheel Quilt Back, Binding, 4. Pinwheel Basting, 5. Pinwheel basting (how 'bout those shelves?), 6. Vivienne's Quilt - A Finish!, 7. Woodland Sampler - January - A Finish!, 8. And Sew On BOM January - A Finish!, 9. Craftsy BOM - unintentionally wonky :/ but A Finish!
Ok, making single blocks doesn't count as "finish" but I finished the blocks for the month, that's what I meant, and making this mosaic (my first) was so very time consuming that I hope you'll forgive me but I don't want to fix it. I was a bit concerned (not a feeling I want to associate with sewing) that I had committed myself to too many "alongs" and "BOMs" particularly since I've never done ANY before this month.
I didn't get two of my big projects finished - the pinwheel quilt or the triangle quilt - but I did get the former basted and the latter has all its required triangles added, though I still have two more months in order to do them for the 2013 Finish Along sponsored by Leanne at She Can Quilt and Rhonda at Quilter in the Gap. I did finish the most important one, the quilt for my new great niece. I'm really happy with it.
In addition, I made two hospice bears and pieced and basted two hospice quilts (I'll quilt and bind them this weekend); paper pieced the three blocks for the Pretty in Patchwork Holidays Sew Along, but didn't get their eyes or the actual pillows made; made one Swoon block (terrible picture here, yet that should still qualify for the 2013 NewFO Challenge by Barbara at Cat Patches); and picked and cut out the fabrics and zippers for the Triple Zip Along but I haven't taken pictures yet.
Linking up to Carrie at A Passion for Applique's Nothing But UFOs. I was going to link up to the And Sew On linky party at Quiet Play but I missed the deadline - still, go look at all the great blocks everyone made!
January is over, can you believe it? We had a great month, skiing up at Mammoth Mountain where the weather was really beautiful. Elvis liked it:

Happy February!
Holli
Monday, January 14, 2013
Retro Flowers
I cannot believe all the flowers are pieced!

We're being very indulgent and skiing for most of this month. I had to bring my sewing machine (and as much gear and fabric as I could get away with!) with me, and all the pieces for this (and several other) quilts. I had two blocks finished from earlier last year. I was a bit bummed that I didn't select my favorite fabrics for this as it was so much work to do. All that exactitude! One print - the blue in the upper right corner - is a Liberty tana lawn. I bought it from Purl Soho with a gift card the Captain gave me for Christmas 2011. When I didn't know anything about fabric. So, I guess that qualifies as a special fabric.
I'm so pleased with these flowers. The Captain is decidedly NOT a flower fan, however. Oh well, I made it for the challenge and because I like it. It isn't a very big quilt, for all that work. I think it needs at least nine more flowers, so that it is five by five. Or should I sash it? If I'm going to make nine more, why not make many many more and make two quilts, one sort of uber bright and one low volume? (Like birthing a baby, clearly I am forgetting how much cutting and pinning and pinning and cutting and pinning and finicky curvy piecing was involved and am only focusing on the end result [not that there was much cutting and pinning involved in birthing my two babies - haha].) It represents reall progress toward my Finish Along goals!
Unrelated to the Finish Along, I did get my Lucky Stars Block of the Month for January complete. Actually, I made three as I'd cut enough fabric before coming skiing. They all look the same as this one, except one is the 6" version and two are the 12" (maybe its 12.5) version. I had the hardest time with this, ripping out seams over and over because I wasn't paying attention. I'll use one block for the quilt that will ultimately come from this activity, and I think I'll make the other into another pillow when we get home. The little one will have to hang around until I figure out what to make of him.

Hitting the slopes for most of the day tomorrow! Thanks for stopping by!
Holli

We're being very indulgent and skiing for most of this month. I had to bring my sewing machine (and as much gear and fabric as I could get away with!) with me, and all the pieces for this (and several other) quilts. I had two blocks finished from earlier last year. I was a bit bummed that I didn't select my favorite fabrics for this as it was so much work to do. All that exactitude! One print - the blue in the upper right corner - is a Liberty tana lawn. I bought it from Purl Soho with a gift card the Captain gave me for Christmas 2011. When I didn't know anything about fabric. So, I guess that qualifies as a special fabric.
I'm so pleased with these flowers. The Captain is decidedly NOT a flower fan, however. Oh well, I made it for the challenge and because I like it. It isn't a very big quilt, for all that work. I think it needs at least nine more flowers, so that it is five by five. Or should I sash it? If I'm going to make nine more, why not make many many more and make two quilts, one sort of uber bright and one low volume? (Like birthing a baby, clearly I am forgetting how much cutting and pinning and pinning and cutting and pinning and finicky curvy piecing was involved and am only focusing on the end result [not that there was much cutting and pinning involved in birthing my two babies - haha].) It represents reall progress toward my Finish Along goals!
Unrelated to the Finish Along, I did get my Lucky Stars Block of the Month for January complete. Actually, I made three as I'd cut enough fabric before coming skiing. They all look the same as this one, except one is the 6" version and two are the 12" (maybe its 12.5) version. I had the hardest time with this, ripping out seams over and over because I wasn't paying attention. I'll use one block for the quilt that will ultimately come from this activity, and I think I'll make the other into another pillow when we get home. The little one will have to hang around until I figure out what to make of him.

Hitting the slopes for most of the day tomorrow! Thanks for stopping by!
Holli
Sunday, January 13, 2013
Finishing-A-Long
I have three quilts I'd like to finish soon.

First, a quilt for my first great niece who joined us in late November. Its not like I didn't know she was going to join us, but I couldn't figure out what to do or even if what I was going to do would be worthy (I suppose that's ridiculous, but making something as a gift for someone feels like such a great responsibility). I've pieced the top, basted it with its backing, half quilted it (I might take that all out and start over again), and have prepped the binding. This should be my FIRST finish.

Second up is a quilt I started last year, or maybe even the year before. This isn't what it really looks like - I was testing it out to see what I'd need to do to make it a full size quilt (a lot, it turns out). I first started quilting in July 2011 as in - I made a quilt in July/August 2011 - so I might have started this later in that year. I didn't know what I wanted to do, and didn't have a pattern, but - from my current perspective and looking at my notes - I must have heard something about 5" squares (charms) though for some reason decided to cut my fabric at 5-1/2". I made what I thought was a quilt top but, turns out, it wasn't big enough, so into the WIP pile it went (it was the first). I did just love the fabric combo though and have wanted to complete it. And so I shall! Unfortunately, I didn't have enough of the original fabric so I had to hunt a bit to find similar fabrics. I think the new ones won't show up as 'new.' I figure I need to add at least one additional row and four or five columns.

Lastly - at least for this go round - is my Retro Flowers. I actually started this as a quilt for the new great niece (see above) but oh, my. What a lot of work! And difficulty matching, etc. So I set this aside and made something (only slightly) less onerous. I wish I'd used more loved fabrics for the flowers - I have an unfortunate M.O. of picking my less-than-favorites for patterns because I think I won't do a very good job and don't want to waste. But I pretty much have liked everything I've made and would like it all so much better if I'd used fabric I loved!! How about taking that as a lesson for the year . . .
Linking up (at the last minute!) with the 2013 Finish A Long hosted by Leanne at She Can Quilt.


Linking up (at the last minute!) with the 2013 Finish A Long hosted by Leanne at She Can Quilt.
Wednesday, January 2, 2013
Wednesday . . . Where was I?
I haven't made it to the cave today because I had to work at my (real) job. I wanted to do WIP Wednesday at Freshly Pieced Its on my list. The linking to all the weekly things. So, instead here's something I made last year and I'm pretty proud of it.

I made this 17.5' roman shade. Actually, I made two. There are 17.5' of windows on the other side of the main salon as well. It was a bit of work to make these.

Sorry about the shadows (what am I saying? we get shadows because there is sunshine!) This is the flybridge (the top part of the boat where the steering is) with all the furniture shoved to the sides so the big shade can be laid out and its battens attached. Lots of measuring, trying to keep it straight. Magazines holding the battens down while the glue dries.

What kind of magazines are read here?
Here is the whole shade (one of them) with its battens all glued down. This waited overnight and then was strung and hung in the salon.
This is a video that shows the shades going up and down - do videos show up on blogger? Well, I guess we'll see:

Probably it won't video. Well, this is the perspective from the front of the salon, looking aft. The video shows the shade going up and down, all 17.5 feet with one pulley. Its so great to have. Nice to be able to get privacy from the neighbors; nice to block the sometimes too much sun.
I used all the instructions from Terrell's Roman Shades website. She has a wonderful process. I made a small shade first, as a tester:

Well, that's kind of dark, but this is the one I made to test the process. Terrell has all of the hardware and calculations. I used Bella Choma. It was kind of a pain because we wanted the "stripes" to be vertical as we have way too much horizontal to the boat. But the stripes begin and end with yellow on each selvage, so I had to cut and seam them precisely to get the shade to look like it was all of a piece.


It was quite a bit of work to make these. They are so functional. And lined. I did make a mistake (well, probably more than one). The lines to raise the shade (there are twelve of them) are secured to each shade with 96 little plastic rings . . . all sewn on by hand . . . after the shade is installed. I didn't want the sewing of the rings to show, so I used monofilament thread thinking that would save me from having to switch between white, gray and yellow thread. Well, the monofilament doesn't hold a knot very well and many of the rings came undone! So I have had to re-sew 192 rings. As if hand sewing 192 rings by hand once wasn't enough.
I think I'll move this post to a tab (when I get to having tabs) about boat sewing specifically.
Thanks for stopping by!
Holli
Tuesday, January 1, 2013
Happy 2013 - Let's Get This Year Started!
Happy New Year!
I was excited to get the first block in Elizabeth's Lucky Stars BOM this morning and thought I'd get right to it. But I also wanted to at least get started on the Monthly Woodland Sampler from The Frosted Pumpkin Stitchery so I picked out my embroidery floss (I'm a bit off on some of the colors, but they're so close I can't imagine anyone is going to be disappointed). Then I stitched the wee-est bit of the first frame. (That one might not make it through the year, but maybe I should give it another week . . . )
I was happy to see everyone's postings about everything they did in 2012. Made me feel somewhat inadequate. I went through my photos and pulled out everything I'd worked on last year. Its a pretty good group of stuff. But the quilty things did not reflect a lot of finishes!
I see that Carrie is hosting Nothing But UFOs in 2013 so I took out my box of UFOs, photographed them, and then decided which ones I (really) want to get done. She wants us to list three for January. Here they are:


3. And last is this quilt top which I made using Ashley's (Film in the Fridge) Scrappy Triangles Tutorial. I didn't have many scraps when I made it, and many of the ones I had I didn't like. But I still like the way the top looks (even though its sideways in this picture - Flickr wouldn't let me copy the one I had edited) and it should be made into a real quilt.
So that's my list for this month! I'm going to be doing (trying, I mean) more than UFOs this year, but I'd like to clear out the UFOs.
I didn't work on the Lucky Stars Block of the Month. But I did make my very first Swoon block!
All the best to all of you - thanks for your help and for stopping by!
Holli
I was excited to get the first block in Elizabeth's Lucky Stars BOM this morning and thought I'd get right to it. But I also wanted to at least get started on the Monthly Woodland Sampler from The Frosted Pumpkin Stitchery so I picked out my embroidery floss (I'm a bit off on some of the colors, but they're so close I can't imagine anyone is going to be disappointed). Then I stitched the wee-est bit of the first frame. (That one might not make it through the year, but maybe I should give it another week . . . )
I was happy to see everyone's postings about everything they did in 2012. Made me feel somewhat inadequate. I went through my photos and pulled out everything I'd worked on last year. Its a pretty good group of stuff. But the quilty things did not reflect a lot of finishes!
I see that Carrie is hosting Nothing But UFOs in 2013 so I took out my box of UFOs, photographed them, and then decided which ones I (really) want to get done. She wants us to list three for January. Here they are:
 |
| Quilt for Baby V |
1. Well, that could be a better picture, but I'd like to get this post done :) This is a quilt I'm making for my youngest niece's first child, a girl. I must complete it soon. To be fair, I only just started it right after she was born on Nov. 30. I put the border on and quilted half of it today so I should be able to finish it this week.

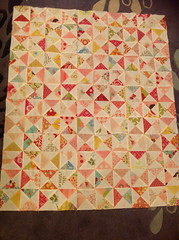
2. My first attempt at HSTs. No pattern so I didn't make it wide enough. I really like the fabrics but don't have enough of these specific ones to add columns. But I want to finish it anyway.

3. And last is this quilt top which I made using Ashley's (Film in the Fridge) Scrappy Triangles Tutorial. I didn't have many scraps when I made it, and many of the ones I had I didn't like. But I still like the way the top looks (even though its sideways in this picture - Flickr wouldn't let me copy the one I had edited) and it should be made into a real quilt.
So that's my list for this month! I'm going to be doing (trying, I mean) more than UFOs this year, but I'd like to clear out the UFOs.
I didn't work on the Lucky Stars Block of the Month. But I did make my very first Swoon block!
All the best to all of you - thanks for your help and for stopping by!
Holli
Sunday, December 30, 2012


Saturday, December 29, 2012
Fresh Press Saturday
I'm still struggling to post. Mostly I don't understand how to get pictures on here and that seems like it shouldn't be so hard. I'm using my iPad. I'm writing this on the blogger app. I take pictures with my iPhone and iPad and they're all saved in camera, or photostream, actually ON this device. Well, anyway it drives me a bit wacko and keeps me from even trying most days.
It was a very intense week of work from the real job perspective and I didn't get much done in the sewing cave. But there was some good mail this week so I started the day today with pressing and folding the latest batches of new fabric.

I just love seeing it all freshly pressed! But there is no more room in my FQ/half yard shelves. I need to sew more! And perhaps buy less (but don't tell the captain, he already thinks that!).
I've enjoyed reading about others finishes and lists of makes for the year and discussions of what will be on the list for next year. I haven't gotten to that yet, but I am going to Sew South in March, and joined the Lucky Stars BOM hosted by Elizabeth at Don't Call Me Betsy. I'm participating in my first ever swap, the Low Volume Charm Swap hosted by Lori at Lori H. Designs, and I even have my fabric, though I'm kind of nervous to cut it - what if I biff it? I'll do it tomorrow anyway. I think I joined something else, but I can't remember what it was. I do have at least twelve lifetimes worth of projects on my "I want to make THIS" list. I intend to make a real list and will strive to participate in linkys.
Happy Saturday!
Holli
It was a very intense week of work from the real job perspective and I didn't get much done in the sewing cave. But there was some good mail this week so I started the day today with pressing and folding the latest batches of new fabric.

I just love seeing it all freshly pressed! But there is no more room in my FQ/half yard shelves. I need to sew more! And perhaps buy less (but don't tell the captain, he already thinks that!).
I've enjoyed reading about others finishes and lists of makes for the year and discussions of what will be on the list for next year. I haven't gotten to that yet, but I am going to Sew South in March, and joined the Lucky Stars BOM hosted by Elizabeth at Don't Call Me Betsy. I'm participating in my first ever swap, the Low Volume Charm Swap hosted by Lori at Lori H. Designs, and I even have my fabric, though I'm kind of nervous to cut it - what if I biff it? I'll do it tomorrow anyway. I think I joined something else, but I can't remember what it was. I do have at least twelve lifetimes worth of projects on my "I want to make THIS" list. I intend to make a real list and will strive to participate in linkys.
Happy Saturday!
Holli
Monday, December 24, 2012
Merry Christmas, and thank you
It has been a very fun year of sewing and fabric and following bloggers, all you good and generous people all over the world.
While the captain and I mostly don't celebrate Christmas out here on the water, its impossible not to feel the kinship and connection with loved ones and fellow travelers at this time of year. My heart is joyful. Thank you for all you share. What a wonderful world we live in. Despite the hurtful bits, we're mostly good, us humans. God bless us, every one.
This latest make courtesy of Katy at imagingermonkey, quick piecing a granny. My first granny. In remembrance of Myrtle, the best Gram ever.
Merry Christmas.
xxoo
Holli

While the captain and I mostly don't celebrate Christmas out here on the water, its impossible not to feel the kinship and connection with loved ones and fellow travelers at this time of year. My heart is joyful. Thank you for all you share. What a wonderful world we live in. Despite the hurtful bits, we're mostly good, us humans. God bless us, every one.
This latest make courtesy of Katy at imagingermonkey, quick piecing a granny. My first granny. In remembrance of Myrtle, the best Gram ever.
Merry Christmas.
xxoo
Holli
(I should apologize for the quality of the iPad photo, but if you saw where I sew, you'd be amazed I can take a picture at all -- let alone sew!)
Sunday, December 16, 2012
Fresh Press

I should have been sewing Christmas presents, or a quilt, or a pillow top, or anything. But I spent the day cleaning up the cave. By around 2:30 everything was put away and cleaned up but for a pile of fabric that had been laundered (I prewash all my fabric, but then I have to press it). So I pressed it. Not too much - I used to iron it all super smooth but realized that was a waste of my time and energy. Just enough so it will lay pretty flat and tidy. One+ yards are folded onto those comic boards and kept in the (relatively) big closet. Half yards and fat quarters are folded the same and kept together. The stack of orange is from the November shipment of Stash Builders from Pink Castle Fabrics. I have a lot of orange in my stash already but I think its my favorite color. The Decembers should be here Monday or Tuesday so I at least have to be caught up with ironing if not actually using them! December is browns - really? Brown? Ick. I was going to cancel for the month but I thought I'd go ahead and see what comes in. I don't have a lot of brown (do you?) and maybe it'll inspire something. Or not.
I love to prewash my fabric. It gives me a chance to get to know it. I have to unfold it so its free to agitate in the washer and dryer. When it comes out of the dryer - often way too dry, but that's usually ok because I rarely have time to press it at that moment - I get to fold it the first time, and it all looks different from when I bought or ordered it. (And how about fabric lint? Its the best! All soft and colorful!) Then I take it back to the boat (my laundry is done at the marina facility) and usually take it down to the cave. Where it sits until I have a chunk of time to iron and fold it. That's the special time with my fabric. Laying it out on my big (relatively) cutting/pressing table, spreading it flat and feeling the fibers, and noticing the print and how it was applied and where it repeats. Then the iron itself (which is a total pain in the **! - this latest is an expensiveish supposedly nice iron that the captain bought me for Christmas last year and it has been frustrating from day one what with its not getting hot enough and spitting all the time and turning off when it should still be on, but I do like the little feet that take it up off the surface when I let go, though that is a bit of a danger as other irons I have used in friends' homes and hotels while traveling DON'T do that!) (where was I?) going over the fabric and I get to spend more time looking at it and imagining how it can be used (apparently, primarily to sit prettily on my shelves, but I'm working on it).
Here's where the FQs and Halfs hang out. I like them alot.

This was written 12/18/12 but I couldn't figure out how to get the pictures to post properly until just now. I'm sure it was worth waiting for - haha. Merry Christmas again!
Wednesday, December 12, 2012
Trimming, non tree version
All those wee little bits sure add up to a big pile here in the dark Sewing Cave . . .

Tuesday, December 11, 2012
Saturday, December 8, 2012
Some Sewing
A successful day of sewing. And now a blog post. These were my goals for this two weeks the Captain is off riding his bicycle with friends: sewing; and trying to better figure out how to blog.

I made this pincushion/threadcatcher, pocket thing (it is actually called a Weighted Pincushion Organizer) based on Elizabeth Hartman's tutorial at Sew Mama Sew. In the photo above it is in the salon (boatspeak for living room) because my sewing room is too dark. I really like the way it looks, but it isn't heavy enough. Maybe I used the wrong rice. It falls off my sewing table and I've only put one thread into the threadcatcher. I think I'll open it back up and maybe put in crushed walnut shells (I have a bag of them) to replace the fiberfill (I'll keep the rice also). Maybe I'll also put some nonskid on the bottom of it so it holds. And maybe I'll put the threadcatcher off to the side, because I also kind of run into it when I'm sewing. I had thought about it when I made it - keep in mind, I have a teensy weensy sewing space - but I always like to (try to) make things they way they are described before trying to insert my own opinions (don't hold me to it, though).
When I was finished with that, I tackled a WIP. I'll try to post properly by linking up with Lee on WIP Wednesday at Freshly Pieced. For now, here's a little look.


I made this pincushion/threadcatcher, pocket thing (it is actually called a Weighted Pincushion Organizer) based on Elizabeth Hartman's tutorial at Sew Mama Sew. In the photo above it is in the salon (boatspeak for living room) because my sewing room is too dark. I really like the way it looks, but it isn't heavy enough. Maybe I used the wrong rice. It falls off my sewing table and I've only put one thread into the threadcatcher. I think I'll open it back up and maybe put in crushed walnut shells (I have a bag of them) to replace the fiberfill (I'll keep the rice also). Maybe I'll also put some nonskid on the bottom of it so it holds. And maybe I'll put the threadcatcher off to the side, because I also kind of run into it when I'm sewing. I had thought about it when I made it - keep in mind, I have a teensy weensy sewing space - but I always like to (try to) make things they way they are described before trying to insert my own opinions (don't hold me to it, though).
When I was finished with that, I tackled a WIP. I'll try to post properly by linking up with Lee on WIP Wednesday at Freshly Pieced. For now, here's a little look.

And yesterday I finished two hospice bears. (They're posing here in my car, a last minute snapshot before sending them off.) The fabric, typically an article of clothing, is supplied by family members - in this case a San Diego Padres' shirt worn and undoubtedly beloved by the person who used to wear it - and, with the prescribed pattern (and strict instructions to add no embellishments that were not part of the clothing provided), volunteers make up the bears, giving family members a sweet, and cuddly, reminder of someone they love.


We'll call this a successful post. Pictures, links, actual work having been done. Let's see if I can manage tomorrow as well.
. . . one more thing . . . someone told me that I have the "prove you're human" hurdle on my comments, but I can't see it to change it - if you see that I'm not allowing comments, please also let me know where I can turn that off - thanks! (and any other suggestions are welcome also - I have so much to learn!)
All the best,
Holli
Sunday, November 18, 2012
The Weekender - Done!
I finished!


And I love it!
I blogged about this earlier (and I know there is some way to link that here, but really, I've only written four other posts, two of which relate to my making The Weekender, so it wouldn't be difficult for any readers to find . . . ).
I chose this fabric, a canvas weight from Ikea (and which I still own at least 10 more yards) because it looks nautical to me and I like how crisp it looks. I have so enjoyed seeing the quilted versions, and think I might try that for my third (I have already decided on the fabric for the second, now that I know I can cheat and use something else behind the outer pockets - thanks to Leanne at She Can Quilt!).
Here are the other pictures I have:


Double inside pocket.

Inside zipper pocket. My first ever!
I am so happy with this bag. In addition to being a fabulous bag that I'm very proud of, it was also my gateway drug to blogging!
Thank you to all of The Weekender makers - it was a lot of fun, and you were all so helpful!!
Wednesday, November 7, 2012
Cuzco Hexies at 27,000 Feet
We took a short flight earlier this week, so I loaded up my new wide mouth zip pouch with a stack of 1" hexie papers and the two mini charm packs of Cuzco that had just arrived in the Happy Mail (I didn't mean to get the mini charms; I meant to get the entire stack of fat quarters regular charms) along with my little snips, enough needles so I could drop a few without worrying that it would mean the end of my project, and some random bobbin threads and made my very first hexie things.

I really like this fabric, and spending time with each bit was special because I was able to look at it more closely and appreciate it. And to then decide I wanted a couple of yards of some of the prints.
The hexies? I think they're kind of pretty, primarily the fabric aspect of them. And it was enjoyable making them (sort of hard with the mini charms to get them wrapped all the way around the paper piece sometimes - probably if i cut them myself I'd use slightly bigger pieces of fabric). But they seem old fashioned to me, not that there's anything wrong with old fashioned. I'm just not naturally drawn to them. I don't know what I'll do with these. I used all but three of the charms from one pack flying up and back. We landed so I didn't get the last three done. I guess they'll be a W.I.P. for awhile!
If I could figure out how, i'd link up with Lee at Freshly Pieced!
Have a great Wednesday!
Holli

I really like this fabric, and spending time with each bit was special because I was able to look at it more closely and appreciate it. And to then decide I wanted a couple of yards of some of the prints.
The hexies? I think they're kind of pretty, primarily the fabric aspect of them. And it was enjoyable making them (sort of hard with the mini charms to get them wrapped all the way around the paper piece sometimes - probably if i cut them myself I'd use slightly bigger pieces of fabric). But they seem old fashioned to me, not that there's anything wrong with old fashioned. I'm just not naturally drawn to them. I don't know what I'll do with these. I used all but three of the charms from one pack flying up and back. We landed so I didn't get the last three done. I guess they'll be a W.I.P. for awhile!
If I could figure out how, i'd link up with Lee at Freshly Pieced!
Have a great Wednesday!
Holli
Monday, November 5, 2012
Learning, Catching Up
The pressure. To post frequently. To not give up before I've even really begun.
I am learning, slowly. Mostly because I would rather be sewing. But I did label my previous posts, so there's an improvement! I've received some great tips and help from my commenters and followers - thanks so much!
We are heading to San Francisco this morning for a business event and I probably won't post while I'm away and just didn't want so much time to go by. I wish I had some pictures of my work over the weekend. I need to figure out a way to do that easily, without having to onerously upload pictures, but maybe it's just an onerous process that everyone goes through.
I didn't finish my Weekender, but I've been showing it off. I am debating taking it with me, but I'm afraid it will get dirty or smooshed under my airplane seat or the overhead. Kind of ridiculous, I suppose, but I do rather enjoy it sitting on the desk bar in the salon!
I also started and finished a quilt top for a new baby that I get to meet right after Thanksgiving! I used the Little Sprouts pattern by Vanessa Christenson, and I just love how it turned out. I will take pics.
And I'm going to make my hurricane Sandy blocks before I leave.
Be well, and don't forget to vote tomorrow (not for a quilt, but for a president!)
I am learning, slowly. Mostly because I would rather be sewing. But I did label my previous posts, so there's an improvement! I've received some great tips and help from my commenters and followers - thanks so much!
We are heading to San Francisco this morning for a business event and I probably won't post while I'm away and just didn't want so much time to go by. I wish I had some pictures of my work over the weekend. I need to figure out a way to do that easily, without having to onerously upload pictures, but maybe it's just an onerous process that everyone goes through.
I didn't finish my Weekender, but I've been showing it off. I am debating taking it with me, but I'm afraid it will get dirty or smooshed under my airplane seat or the overhead. Kind of ridiculous, I suppose, but I do rather enjoy it sitting on the desk bar in the salon!
I also started and finished a quilt top for a new baby that I get to meet right after Thanksgiving! I used the Little Sprouts pattern by Vanessa Christenson, and I just love how it turned out. I will take pics.
And I'm going to make my hurricane Sandy blocks before I leave.
Be well, and don't forget to vote tomorrow (not for a quilt, but for a president!)
Wednesday, October 31, 2012
More Weekender
I LOVE my Weekender!!!
I'm not quite done with it; putting that lining in is a bit of a bitch. I got the bottom of the lining tacked down (ugly work, but its covered anyway) and am still doing the hand sewing around the zippered opening. I think it needs to be tacked at the seams where the main panels meet the side/top panels, just to keep it tidier inside. I'll blog more about it all when I'm completely done, and put in my two cents on what changes I made and what I think would make the next one go more smoothly. Here is a picture of it in its not quite done state (oooh! my first picture!)
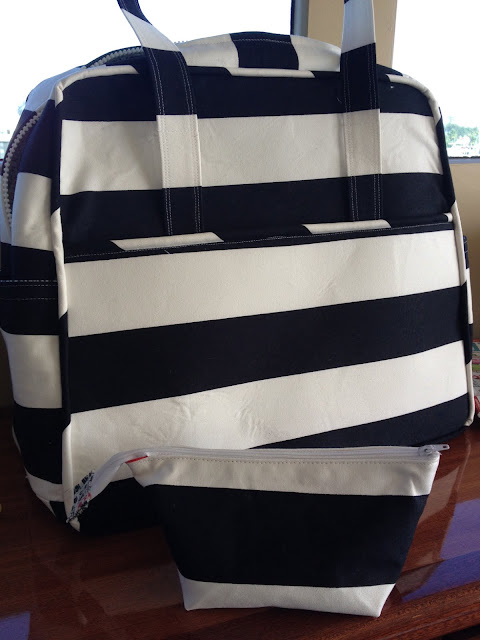
So, I'm writing because of what is wrong with the picture. Not the picture so much (I'm sure there's much wrong with it, but I'm not striving to be a photographer) as what is in it. You can see my Weekender and the little pouch in front of it (made using this tutorial at Noodlehead) (ooh! my first link!)
First, the little pouch. It was kind of weird to make, what with pushing the zipper out of the way, and I wonked it a bit. You can see the little wee bit of the red lining peeking out a the end of the zipper. I didn't want to remove the stitching to do it over, but I'm going to because otherwise it will bother me forever. The next three that I've cut out I'm certain I will do better. Just need some more zippers (anyone know a good source?).
Second, The Weekender. There are a couple of things I see that are issues. First, fusing the Peltex to the exterior fabric has left some wrinkles. Of course, some of them could be from turning the bag inside out and back again through a couple of the steps. The pattern doesn't say to fuse the Peltex directly because we aren't asked to use fusible Peltex. I spent more on the fusible and perhaps saved the step of using the prescribed separate fusible to attach it to the main fabric. I do like the fusible Peltex, but maybe when the instructions said to hold the iron on it for 10 full seconds I skippedseven a few.
Also, see near the top where the handles used to be stitched to the bag? Might be hard to see in the picture; its just below the first navy strip at the top. When I was turning it right side out, the stitching just ripped right out! Well, that won't do on a bag of this otherwise robustness. I'm going to use my secret weapon to fix them.
Ok, that's enough for now. I'll have more pictures later (today or this week) that show the lining and maybe even another thing or two.
When I'm done, should I put the picture of the finished bag on Flickr? Should I link up to something? Where does one find the etiquette on these things? Research, research, research, sew, sew, sew . . .
Holli
I'm not quite done with it; putting that lining in is a bit of a bitch. I got the bottom of the lining tacked down (ugly work, but its covered anyway) and am still doing the hand sewing around the zippered opening. I think it needs to be tacked at the seams where the main panels meet the side/top panels, just to keep it tidier inside. I'll blog more about it all when I'm completely done, and put in my two cents on what changes I made and what I think would make the next one go more smoothly. Here is a picture of it in its not quite done state (oooh! my first picture!)
So, I'm writing because of what is wrong with the picture. Not the picture so much (I'm sure there's much wrong with it, but I'm not striving to be a photographer) as what is in it. You can see my Weekender and the little pouch in front of it (made using this tutorial at Noodlehead) (ooh! my first link!)
First, the little pouch. It was kind of weird to make, what with pushing the zipper out of the way, and I wonked it a bit. You can see the little wee bit of the red lining peeking out a the end of the zipper. I didn't want to remove the stitching to do it over, but I'm going to because otherwise it will bother me forever. The next three that I've cut out I'm certain I will do better. Just need some more zippers (anyone know a good source?).
Second, The Weekender. There are a couple of things I see that are issues. First, fusing the Peltex to the exterior fabric has left some wrinkles. Of course, some of them could be from turning the bag inside out and back again through a couple of the steps. The pattern doesn't say to fuse the Peltex directly because we aren't asked to use fusible Peltex. I spent more on the fusible and perhaps saved the step of using the prescribed separate fusible to attach it to the main fabric. I do like the fusible Peltex, but maybe when the instructions said to hold the iron on it for 10 full seconds I skipped
Also, see near the top where the handles used to be stitched to the bag? Might be hard to see in the picture; its just below the first navy strip at the top. When I was turning it right side out, the stitching just ripped right out! Well, that won't do on a bag of this otherwise robustness. I'm going to use my secret weapon to fix them.
Ok, that's enough for now. I'll have more pictures later (today or this week) that show the lining and maybe even another thing or two.
When I'm done, should I put the picture of the finished bag on Flickr? Should I link up to something? Where does one find the etiquette on these things? Research, research, research, sew, sew, sew . . .
Holli
Saturday, October 27, 2012
Weekend(er)
I am making The Weekender. I should link to the good people who are hosting the blog hop about this. Forgive me for not yet knowing how. I'll get there.
I picked some home dec fabric and cut it out earlier this week. Then I realized I needed more Peltex (and didn't pay attention to the kind I have - 72F, double sided fusible) as well as the fusible interfacing, so I took a quick-ish trip to the biggest JoAnn's around these parts, a much longer drive than the closest JoAnn's, but it's always a bummer to go the easy route only to learn that they don't have what I want, right? I also wanted to try to find a lining that would go with the home dec I had cut (NOTE: figure out how to add pictures to posts!). I am/was thinking I'd make two Weekenders so decided to get a whole bolt of the Peltex since one Weekender takes 3+ yards. I couldn't find the 70, so I bought the 71. The 71 is fusible on one side . . . And $3 per yard more. I didn't realize this until checking out, but thought $8.99/yard for 20" wide material was a bit steep. Thankfully I had a 50% off coupon. I went back to the interfacings section(because I really couldn't believe it was $8.99/yard even though that was printed on the label) and that's when I learned about the important differences. I was in a rush so I didn't exchange it (helped by the thought of the 50% off) and just hoped that as I worked on the bag(s) I'd really appreciate the benefit of the fusibleness.
This morning after kayaking around the bay with the Captain and Elvis (he should have a title, I think), I got back to work and cut out the Peltex. Well, first I made templates of the pattern pieces. Figured if I was going to make more than one bag, I should have something more substantial than the paper pattern. Also, because I read all (ok, just some) of the instructions, I noticed that we are to lay out the cut exterior fabric pieces onto the Peltex, cut them out, and THEN measure 1/2" all around and cut that OFF - thereby wasting full inches of very expensive material. Instead, I made a second template for the main pieces, these templates already reduced by 1/2" all around. Then I cut out the Peltex and am unsure if I actually saved any in the process, but it felt like a frugal thing to try.
I made the straps longer, and then remembered I'd read that others made them wider, so I recut the Peltex to 1-1/4" vs the 7/8" the pattern calls for. Later, I had to figure out how wide to cut the lining (which becomes the handles) and after much mathiness determined it was 3-3/4" (vs 3" in the pattern). I'm trying to keep track so I'm writing these things on the pattern instructions.
Well, after all that work (it wasn't that much but kind of it was) I decided I didn't like the fabric I chose, so I chose something else and cut it all out. It's a wide stripe, navy and white (rather nautical I think) and then worked to match the stripes up on all the pieces. We'll not know until actual sewing takes place whether I was successful.
Pictures would help this post immeasurably. Who would wade through all of this? Yikes, I'm bored just looking at it!
It's a gorgeous day here. We're all up on the fly bridge. Time for a little nap, and then back to Weekender.
Good thoughts being sent to people on the East Coast. Stay safe.
**snazzy signature here!**
Subscribe to:
Posts (Atom)